Corrosion in pipes is
common and complete pipe wall loss or through-hole defects are a regular
occurrence within many facilities. In the Oil & Gas and
Offshore industry where flammable gases are present, it is necessary to fix
these types of pipe leaks and pipe defects with cold curing repair. The reason
is because hot works are generally prohibited.
Composite repair system
using composite wrap must meet the minimum requirements and perform at the
expected level under extreme conditions. Numerous composite repair materials
are available on the open market today, but there are few that have the testing
and capability to perform at the elevated temperatures which may be experienced.
Steps:
Gathering Pipeline Data & Information
When performing online
pipe leak repairs, it is necessary to follow in accordance to ASME PCC2 and ISO
24817 standards and requirements. All data for the pipeline operating pressure,
temperature, pipe size and pipe medium should be gathered and reviewed.
Detailed Engineering Calculation and Application Method of Statement
A detailed engineering
calculation and report specifically to the pipe leak shall be generated to
determine the quantity and type of materials to be used. The method of
application (method of statement) detailing a step-by-step repair technique
shall be provided and approved by the client.
Site survey should be
conducted prior to work commencement, so that all risks are assessed and
detailed into risk assessment report. All Personnel Protective Equipment should
be worn and risk mitigating/ reducing steps employed to minimize or avoid all
unnecessary risks.
Surface Preparation of Affected Pipe Section
Before work commencement, always try to shut off or
reduce the pipeline pressure and temperature as much as possible. Commencing
surface preparation by using the grit blasting technique - clean affected pipe
surface to SA 2.5 standard whenever possible. At locations where grit blasting is not possible, these
locations shall be cleaned with appropriate non-spark tools.
The length of surface preparation
should be in accordance to the Engineering Calculation Report provided. While
performing surface preparation, pipe surface should remain dry throughout the
repair application. Prepare the pipe surface roughness to approximately
60 to 80 microns. Use a surface roughness tester to confirm the prepared
surface roughness has been achieved.

Commencement of Pipe Leak Repair Works
Commence pipe repair procedure – pipe leak repair process
should commence within 4 hours after the surface preparation has been
completed. Before commencing of pipe repair works, ensure the leak location is
properly marked.
Put
on the latex gloves and knead appropriate amount of SS106 Seal Stic underwater
epoxy stick to cover the area of the leak. Apply the mixed Seal
Stic onto a stainless steel sheet metal. Meanwhile, prepare several sets of
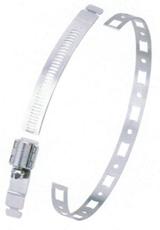
SealXpert stainless steel clip by cutting an appropriate length of the steel clip.
Connect the cut-off length of stainless steel clip with adjustable fasteners.
Wrap the connection with adjustable fastener with a PVC tape. Place the
stainless steel backing against the SealXpert stainless steel clip while the
Seal Stic faces the pipe surface, away from the leak location.
Tighten the
adjustable fastener of SealXpert stainless steel clip slightly and slide the several
sets of clip to the leak location. These SealXpert stainless steel clips should
be seated next to each other, securing both the centre and edge of leak
location. Continue to tighten the adjustable fastener of SealXpert stainless steel
clips while ensuring that the Seal Stic is covering the leak hole.
Rebuilding of Affected Pipe Section
Once the leak is arrested, apply SealXpert PS102 metal
repair putty. Mix the hardener portion of PS102 metal repair putty into the
resin container and apply the mixed repair putty over the prepared pipe section
(around pipe length and circumference). The applied coating thickness should be
in accordance to the Engineering Calculation Report provided. Allow the coated SealXpert PS102
repair putties to cure for sufficient time (curing time is dependent on
pipeline operating conditions) and observe leak condition. Use a barcol
hardness tester to confirm the cured putty has obtained at least 85 Shore D
hardness.

Composite Pipe Wrapping
Put
on the latex gloves and tear open the Wrap Seal PLUS fiberglass repair tape and
immerse it in water for 10 seconds; squeeze the roll while immersing it in
water. Remove the fiberglass tape from the water and start wrapping the Wrap
Seal PLUSTM fibreglass repair tape. The wrapping of fiberglass tape
should start at least 100mm to 200mm before the leak area. Wrap the pipe as
tightly and evenly as possible, pulling slightly after each round of wrapping.
Apply the entire roll over the pipe surface with at least 50% overlap for the
entire pipe repair length.
Total length of wrapping should be in accordance to
Engineering Calculation Report. Repeat the wrapping for a specific number of
layers of Wrap Seal Plus fiberglass repair tape and finally tapering off with
approximately 25mm over each wrapping layer. The wrapping direction should be
done in one direction.
 |
Inspection of Repair
Allow the repaired area to be cured for several hours
(duration is dependent on pipeline operating condition). Check to confirm the final
Barcol hardness measurement.
Repair job is completed and the repaired system can be
operated back to normal operating conditions.
Tidak ada komentar:
Posting Komentar